Suspension, brakes and steering
The inboard rear brakes
The rear discs sit inboard beside the differential. That saves unsprung weight and costs you access, and it changes how the brakes are inspected, shimmed, bled and adjusted.
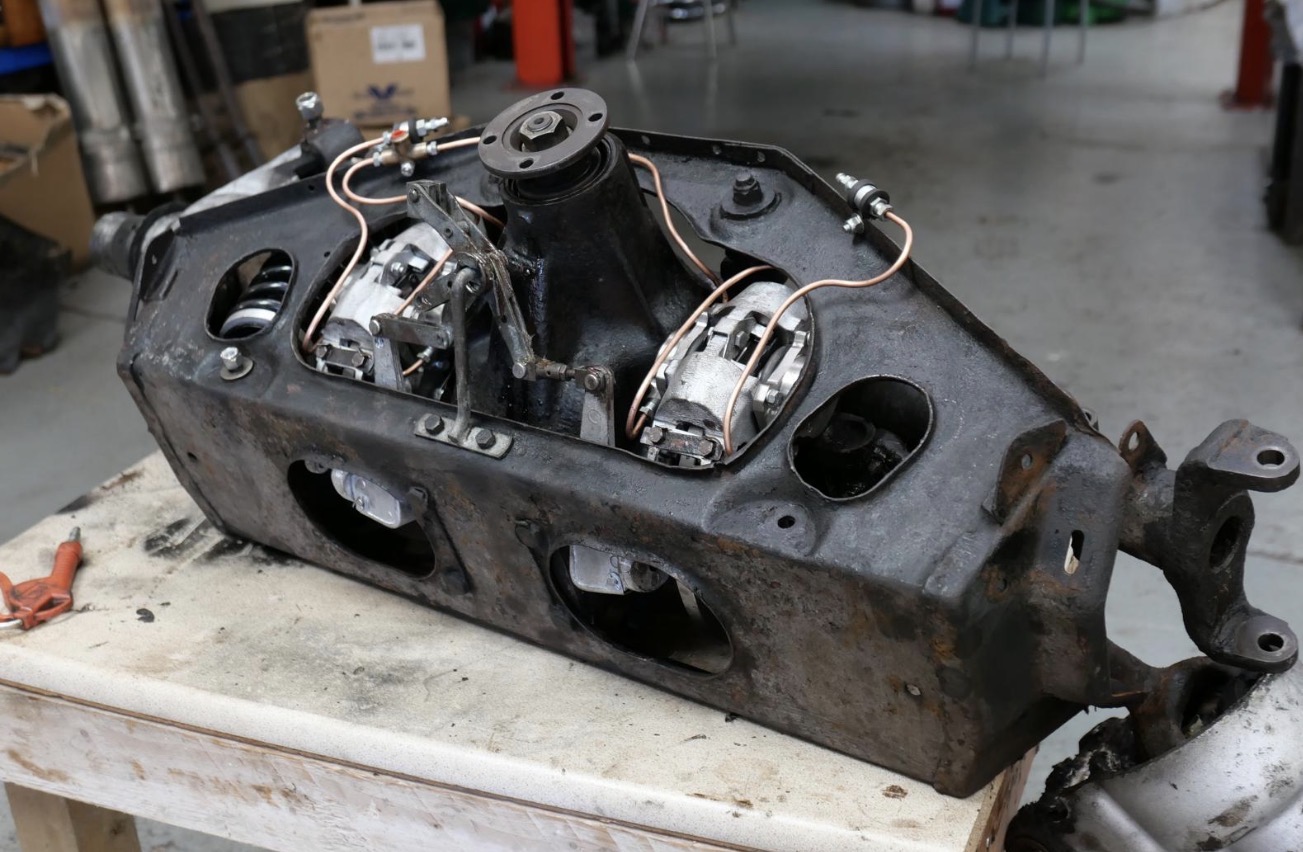
The E-Type carries its rear brake discs inboard, mounted on the differential output shafts inside the rear suspension cage, rather than at the wheels. The reason is unsprung weight: every pound of brake assembly moved inboard is a pound the suspension no longer has to control over a bump. On a car designed around ride and roadholding that was a real gain, and it is the same reasoning that put inboard brakes on racing cars of the period.
What it costs is access. Everything below follows from that one decision.
What is actually in there
Each side carries two separate calipers, not one. The main service caliper does the braking. A second, smaller handbrake caliper with its own pads acts on the same disc and is operated mechanically. The two are coupled together, and on Series 2 cars the assembly is large enough that the pair cannot be rotated out of the cage as a unit.
The cage has a bottom cover. This matters, because it is the difference between the E-Type and most other cars using the same Jaguar independent rear suspension: on a jag-lovers thread about fitting E-Type brakes into an XK140, a contributor observes that the modified car probably has no access panel as there is on an E-Type. That cover is the reason the question of whether the whole cage must come down has more than one answer.
Also in there: bridge pipes between the caliper halves, the caliper centring shims described below, and the differential output shafts and their seals.
What changed across the series
Fosseway Performance, who make replacement and uprated E-Type brake components, describe the original systems this way. Series 1 cars used Dunlop brakes with, in their words, a small brake pad and thin discs which become hot and can lead to brake fade and warping. Series 2 introduced Girling three-piston front calipers, but Jaguar still did not fit a vented front disc, so fade remained possible. Series 3 was the first with vented front discs, and the calipers themselves remained virtually unchanged.
That account is a manufacturer's and is about the system as a whole, the front brakes included. This archive has not established the exact point at which the rear calipers changed from Dunlop to Girling, or whether the change tracked the front. What can be said is that suppliers list rear caliper pistons in both forms today, Girling at one and three quarter inches and Dunlop as a separate part, so both exist on the rear across the range.
Handbrake pads are also split by date rather than by series alone: suppliers list one pad for early 3.8 cars and a different one for late 3.8 and Series 1 4.2 cars. A car's build date matters more than its badge when ordering.
The question everyone asks: can the pads be changed in situ?
This is the most searched thing about E-Type rear brakes and the answer in circulation is muddled, so here is what the published accounts actually say.
For a full caliper removal or overhaul, the accounts agree that getting the cage out is easier. On jag-lovers, responders to an owner asking whether the brakes can come off without removing the independent rear suspension say it is a lot easier to remove the suspension and that the brakes are then easy to get at, and a later post states that with the assembly on a bench by far the easiest way to get the rear calipers off is simply to remove the cage.
For the removal sequence itself, the most detailed published account is a restoration series by The Motorphile, working on a Series 2. It reports that the standard manual instructions do not work for Series 2 calipers, and gives this order instead.
- Unbolt and remove the bottom cover from the suspension cage
- Undo the inner half-shaft universal joints
- Detach the main brake calipers from the handbrake calipers
- Remove the two pieces separately, one after the other
- Remove the disc once the caliper is clear
The reason for the third and fourth steps is that with the Series 2 handbrake assembly attached, the units are too big to rotate and remove from the suspension cage. The same account carries one warning worth repeating: save the small fork that holds the main caliper and the handbrake caliper together. It is easy to lose and not obvious on reassembly.
What the archive cannot settle is whether the bottom cover alone gives enough access to change service pads without disturbing the half-shafts. Owners clearly do attempt it, and there is a standing thread on the E-Type Forum about cutting an additional inspection or access plate, which would not exist if the factory access were sufficient. But no published account consulted here describes a straightforward in-situ pad change from start to finish. Anyone told by a seller that the rear pads were just done quickly is entitled to ask how.
Shimming the calipers to the disc
This is the part of the job that is least written about and most often got wrong, and it is specific to this layout.
The rear calipers are not self-locating. They are positioned relative to the disc by shims under their mountings, and two thicknesses are catalogued: C13198 at 0.005 inch and C13199 at 0.020 inch. Moss Motors list C13199 as a rear brake caliper centring shim for the E-Type Series 1 and 1.5; Martin Robey and Welsh Enterprises list C13198 on the same basis.
The method reported by owners who have done it is the useful part. On a jag-lovers thread specifically about shimming Series 2 rear calipers, the consistent advice is to centre the disc within the caliper body, and to ignore the pistons entirely, because the pistons move. The caliper casting carries a visible centreline mark, and that mark, not the piston faces, is what the disc is lined up against. One contributor reports resolving his own car with two shims of 0.015 inch.
One poster on that thread cites the workshop manual as calling for the caliper to be centred within 0.7 mm side to side. The archive has not read that figure in the manual itself and records it as a forum report of a manual figure rather than as an established specification. It is quoted here because it is the only numerical target in circulation, and because somebody holding the manual can settle it in a minute.
Why it matters: a caliper sitting off-centre puts one pad harder against the disc than the other, which is one of the explanations for the uneven wear described next.
Uneven pad wear, and what it usually means
Owners report inboard and outboard pads on the same caliper wearing at noticeably different rates. On jag-lovers, the causes put forward are frozen caliper pistons, and brake fluid that has gummed up on one side or the other when fluid is not changed at regular intervals. Shimming is the third possibility and is the cheapest to check.
Two points of terminology from the same discussion, which save confusion when ordering: the piston assemblies are described as ambidextrous, while the mounting housings are handed left and right. A caliper body from the wrong side is not a part you can persuade into place.
Bleeding, and what the aftermarket tells you
The clearest evidence of how awkward the inboard rears are to bleed is that several suppliers sell dedicated rear brake easy-bleed kits for the E-Type, priced between roughly a hundred and twenty and a hundred and eighty pounds at the time of writing. A remote bleed kit is not a part anyone develops for a job that is straightforward.
If a car's rear brakes feel soft after work and the fluid is fresh, air trapped at the inboard calipers is the first thing to suspect rather than the last.
The handbrake is a separate problem
The handbrake acts through its own small calipers and its own pads, so a handbrake that will not hold says very little about the condition of the service brakes. Its cables, linkage and adjustment run the length of the car, and the mechanism rather than the main calipers is the usual cause.
This is a genuinely unresolved subject in the hobby. The E-Type Forum carries a long run of separate threads on handbrake adjustment and on handbrakes that will not hold, spanning years, and the aftermarket sells complete uprated handbrake kits at around a thousand pounds, split again between early 3.8 cars and late 3.8 and Series 1 4.2 cars. Both facts point the same way: the original arrangement works when it is right and is difficult to get right.
Oil on the discs
The discs and calipers sit beside the differential, so brake heat and differential oil share a small space. Leaking output shaft seals contaminate the discs and pads, and brake work that goes back together without attending to the seals invites a repeat of the whole job, which, given everything above, is an expensive way to save an afternoon.
If the cage is out for brakes, the output seals are the obvious thing to do while it is on the bench.
On a test drive, and what to ask a seller
Rear brake problems show as a pull under braking, a handbrake that will not hold on a slope, or a hot, dragging corner after a run. None of them can be checked by looking through a wheel, because the brakes are not at the wheel.
Given the access the layout demands, any of those deserves a proper look underneath before purchase rather than a hopeful adjustment afterwards. A seller who reports recent rear brake work has either spent real money or spent many hours, and the invoices are worth reading: whether the cage came out, whether the calipers were shimmed on reassembly, and whether the differential output seals were done at the same time.
Where a car is already doing one of these things, the archive works through the same symptoms step by step in the brakes dragging or pulling diagnosis.
Sources
- Fosseway Performance, E-Type brake upgrades, for the description of the original Dunlop and Girling systems, the absence of a vented front disc before Series 3, and the existence of uprated rear and handbrake kits.
- Moss Motors catalogue listings for C13198 and C13199, for the shim thicknesses and the Series 1 and 1.5 fitment.
- Martin Robey and Welsh Enterprises catalogue listings for the same caliper shims.
- The Motorphile, Jaguar XKE E-Type restoration series, rear suspension and brakes, for the Series 2 caliper and disc removal sequence and the coupling fork.
- Jag-lovers forum, E-Type rear brakes thread, for the removal versus in-situ discussion, uneven pad wear, and the handedness of the caliper housings.
- Jag-lovers forum, Series 2 shimming the rear brake calipers, for the centring method and the reported manual tolerance.
- The E-Type Forum, the standing threads on handbrake adjustment and on handbrakes that will not hold.
- Classic and Sports Car, Jaguar E-type S1, S1.5 and S2 buyer's guide, for rear brake inspection points.
- Photograph of a rear suspension cage with remote bleed lines fitted, supplied to this archive by Stephen Ruddick, owner of TUK 129F, and used with his permission.
Last reviewed .